


The question "How do I format and reinstall my Computer PC?" might come to mind for a variety of reasons. For example, when Windows has so many errors that reinstalling is the only option to get the PC working properly again.
It could also be because you want to sell your PC, and inorder to make sure that no personal files and sensitive data are left on the PC.
For both, formatting the PC, or hard drive, where Windows is on is the perfect way to do achieved that.
What is formatting?
We are talking about formatting Personal Computer (PC) Desktop or laptop. It is more than just wiping the storage because what we are really going to do during the process will make the hard disk of the computer suitable for the operating system and the software that we want to use on the computer.
During formatting, the hard disk is also provided with a file system. A system that allows the operating system to quickly find the files stored on the PC as soon as they are needed.
The operating system that we usually want to make our computer suitable for is Windows Operating System, such as Windows XP, Windows 7, Windows 8 and Windows 10.
One thing we have to remember, when we are going to format a hard drive, is that everything on it is will be totally erased.
NOTE: If you just want to upgrade your Windows Operating System this formatting procedure is not for you.
There are recovery procedures, which are often delivered on CD-ROM with a laptop or PC, where formatting is part of this recovery procedure. But you should certainly not confuse that with just formatting.
However, to format a PC you do need a recovery CD-ROM or installation CD-ROM or installation DVD (or simply Installation Disk). Because you need to boot the Personal Computer (Desktop or laptop) with this. Keep it in mind that in order to be able to format the hard disk that Windows (Operating System) is on, it must not be in use. Something that would be the case when you start up the PC in the usual way.
Change disk drive boot order
To boot your PC from an installation OR RECOVERY DVD, you may first need to change the boot order of the disc drives in your PC's firmware known as BIOS (Basic Input and Output System) settings.
This may sound very complicated, but it's not so hard when we look at what happens in your computer as soon as you turn on the computer.
Before Windows is on your screen and you can start working with the computer, a lot has already happened in your computer. What exactly happens and why the computer is not doing what you would like to do, namely booting from the Installation DVD of Windows, we are now going to take a closer look.
As soon as you turn on your computer, the computer goes through a built-in program that checks what kind of components are present in the computer and whether they are functioning properly known as POST (Power On Self Test). Only after that, the control of the computer is transferred to Windows.
After turning on the computer, this built-in program looks at, among other things, in which order the devices, from where you can start up, must be addressed.
Often the manufacturer or supplier of your computer has set that program so that it first checks whether it can be started from a hard disk, because that is what Windows is on. We just want to replace it. Of course, the DVD drive, which contains your Windows installation disk software, will not be viewed as a boot option based on the setting.
The boot order must therefore be changed in such a way that the computer will firstly check whether it can start from the DVD drive in your computer. It will indeed boot from there and thus start the Windows installer that is on the installation DVD.
You can change the boot order yourself and it goes like this:
Turn on the computer and press the DEL(ete) key (or options displaying by your computer for accessing BIOS setup) immediately after turning it on. After a few moments, the BIOS settings window of your computer will appear on your display. The image below shows an example of the BIOS settings window. The image may differ in detail, but the similarities will be sufficient to be able to adjust the boot order in the BIOS yourself.
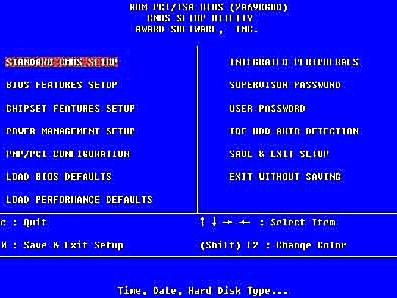
Also in the settings window of your computer's BIOS, the Advanced BIOS Features option will appear. Use provided key options to adjust the settings as needed press Enter key.
Within Advanced BIOS Features, you will discover the Boot Sequence option. Choose this option using the arrow keys and press Enter again. You will now get something in the picture that looks like the image below. Namely, the devices from which the computer can boot and the order in which the computer will access them.
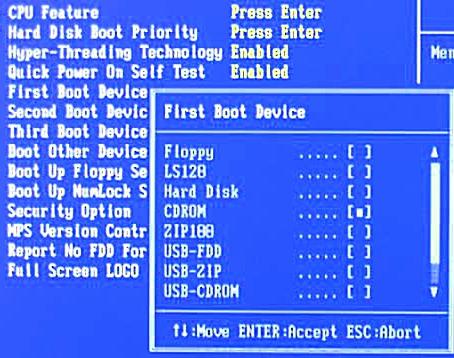
In the image you can see that the devices from which the computer can boot are numbered as: 1st Boot Device, 2nd Boot Device, and so on. In the case of the image above, the computer will first try to start from floppy disk. If it does not find a floppy disk, it will try to boot from the hard disk. If it is also not possible to start from hard disk, only then the CD-ROM will be tried, in this case your installation DVD - We don't want that.
We want the computer to first try to boot from CD-ROM. The CD-ROM should therefore become the 1st Boot Device. The order of devices from which you can start is very easy to adjust. Select the 1st Boot Device using the buttons. Then you can use the Page Up (PG UP) and Page Down (PG DN) buttons on the keyboard to choose the device that should become the 1st Boot Device, in our case that becomes the CD-ROM. Furthermore, we want the hard drive to become the 2nd Boot Device.
Once you have changed the 1st Boot Device to CD-ROM and set the hard disk as the 2nd Boot Device, press the F10 button to save the new settings. The computer will now ask you if you want to save the settings and exit the BIOS settings window. Press the letter Y (Yes), and then press Enter. The computer will exit the settings window and restart the computer.
When you have completed the step-by-step plan correctly, the computer will now boot from the installation DVD.
The step-by-step plan just given to change the boot order of the boot devices in the computer is a step-by-step plan for the Phoenix-Award BIOS, by far the most used BIOS in computers. This means that this BIOS is not always used. This does not make the step-by-step plan just discussed unusable, but you may need another key, for example, to get into the BIOS settings window. For the Phoenix-Award BIOS we use the test DEL(ete). Other keys that can provide access to the BIOS settings window are: F1, F2 or ESC. Which key you use to access the settings window is usually displayed shortly after you turn on the computer or can be found in the booklet about the motherboard, a booklet that is often included with a computer.
NOTE: If the key is displaying on your computer you can press the (Esc)ape key immediately you power on your computer this will enable your computer to display the appropriate key during booting.
Booting up and formatting hard drive
If the installation disc or recovery disc is in the DVD player and the BIOS is set correctly, after a few moments the message appears: "Press any key to boot from CD...". Press any key on your keyboard to actually start your computer with the installation disc or recovery disc.
Windows will then start the installation procedure, which includes formatting the hard drive. But first you will start loading Windows files as you will be able to see on the screen. After which the Windows logo appears.
Then choose your preferred language, time zone, currency, and set United States (International) as your preferred keyboard. Then click the Next button.
In the follow screen, click on the "Install Now" option. Because as mentioned, formatting the computer, or the hard disk, is part of the installation procedure of Windows.
Then click on "I agree to the license terms" and on the Next button.
Windows will ask you what type of installation you want to perform on the next screen. Click here the option Custom.
Delete all existing partitions. You do this on the page where Windows asks you where you want to install Windows. Select the partitions to be deleted and click "Erase".
Then, in the same window where the partitions used to be, select the freed-up space on the disk and click "Next".
Windows will now start formatting the hard drive, after which the installation procedure will continue with reinstalling Windows.
You see, on the question "How do I format my PC"? a short answer is not possible. Because it is a procedure that requires quite a bit of attention and time. Also, formatting your PC, or the hard drive that Windows is on, is something you need to prepare thoroughly.
Because not only Windows will have to be reinstalled, but also all other software that you use on your PC. Not to mention all the files you had stored on the PC. As mentioned, formatting the hard drive erases all files and data from the hard drive.
It is therefore important to check all software, files and data to see if you have a backup copy somewhere. Or in the case of software, have an installation disc or installation file.
Again, formatting your PC is a bit of a job. But along with reinstalling Windows absolutely worth it. Because this is the only real way to give your PC or laptop back to its original speed. You can also get additional information through this LINK.